6 steps from concept to production
Every once in a while, I hear this from our customers: “We have a working prototype and now we just need your help to produce it.”
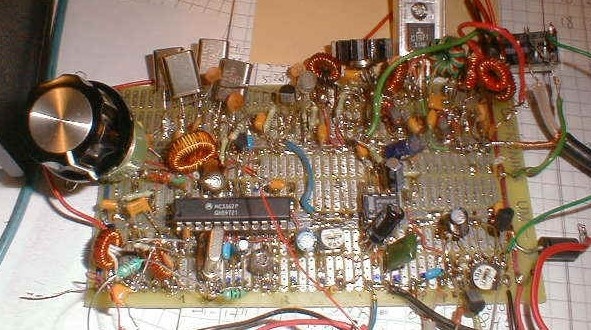
Surprisingly, after this statement, they proudly show me something like this:
Finally, I stopped being shocked that this comes from both startups and established companies. Both see unique market chances, but not being aware of how complex is the process from concept to production. Many do not know that their prototype is just the 1st step in the process. Assuming they have completed market research, identified product need, buyer personas, etc.
Used terms for this phase are “Proof of Concept”, “Duct tape prototype”, “Quick and Dirty” or “Frankenstein” (my favorite).
1. Proof of Concept (aka Frankenstein)
Despite it looks scary, you should build a monster prototype. It will enable you to mitigate risks and prove that technology behind the idea is working. Frankenstein works like a final product, but doesn’t look like it. That is why popular term is “Works Like”.
Beside technical feasibility, in this phase you should consider human factors and ergonomics. In parallel with “duct tape electronics”, your team should be working on the early user experience. This includes exploring industrial design forms.
Firmware team should start learning the development for target chips, without waiting for the custom board.
2. Engineering Prototype (aka “Works like – looks like”)
The goal is to develop looks-like, works-like prototype, with a design intended to be production-ready. It requires synchronized effort between industrial, mechanical and PCB design, firmware and software development.
Rapid prototyping processes are used to create custom parts for this phase, because they deliver fast turnaround. While these parts are good for fast turnaround, learning and testing, they are not appropriate for the final product.
Many design engineers tend to go for a quick prototype design and later do tweaks to optimize product cost. Be careful, as product may get of target COGS, thus making the business model non-viable. It’s best to start Design-for-Manufacturing (DFM) strategy early and optimize the design with target supplier in mind.
Depending on the target production volume, you should consider design effort costs vs production costs. Quick design option can make sense on low target production volume or when business objective is to get buy-in or funding. It really depends on what you want to optimize.
3. Engineering Verification (EV)
This phase is a design iteration that should fix issues detected during the assembly, system integration and testing of the first Engineering Prototype. The EV is usually identical to the final product.
Changes from Phase 2 to Phase 3 should be strictly controlled. Too many changes add risk of introducing new issues and additional semi-phase for fixing them. This could result with project going into overspend and prolonging time to market.
Building units at this phase is still expensive, due to low volume production processes applied.
Engineering Verification Tests will be done in this phase. This means testing product functionality and durability in order to verify the design.
At the end of this phase, you should have findings from field tests and durability tests. This is the moment where go/no go decision about transfer to production is made. That is a big financial decision, since the program so far probably spend around ¼ of the total funds and the significant investment needs to be made in the next phases.
4. Manufacturing – Design Verification (DV)
The purpose is to teach the CM how to build the product and find any remaining DFM issues. There should be few differences from EV to DV. The parts used in the DV build should be virtually identical to the EV build. The CM now needs to work with your team on process development, determining how to make your product with consistent quality.
The design should stabilize at this time. Any changes should be minor and must be controlled and documented via an Engineering Change Order (ECO) process.
This is the time to develop assembly fixtures, test fixtures and manufacturing test and calibration software to be used during the assembly.
Prototypes in this phase are convenient to be used for compliance testing. Every product sold on the EU market must have a CE mark. It means it has to comply with safety and EMC requirements.
5. Manufacturing – Process Verification (PV)
The purpose is to verify production processes created in the previous phase. There should be no changes in the design and everything should be prepared to move to mass production.
However, in real life, there are still issues that are being discovered in this phase. Considering that changes should be avoided, all issues should be evaluated. Critical issues that influence product quality, manufacturability and yield should be fixed, while other changes should be left for next design iteration.
6. Mass production
This phase is about mass production and ramping up the volume.
There will still be issues that cause the product to fail out of the box. Most issues are booming during PV phase, but over the few months in mass production, they will calm down as things are getting fixed.
You should still continue to test finished products and fix issues that are arising over period of several months. Reliability program should be established where product samples are taken and put through durability tests.
When you are confident that large number of issues is fixed, you can start ramping up the production.
As with every hardware product, there may still be low incidence defects, that occur e.g. 1 at 1000 units, which may take long time and significant effort to find the root cause and resolve.
————————————————————————————————————————
Hope this brief post helps to set the expectations about the wild ride going from concept to production.
In case you need support or more details, feel free to get in touch and we can have chat about resolving your challenges.